My daughter's Boston terrier had to go to the emergency vet last evening after a day of restlessness, vomiting and just not acting like himself. Turns out, long story short, he had a chunk of Nylabone in his stomach which was not allowing any food, even water, to pass into the intestine. He had surgery during the night and if he can keep food down today, will come home tomorrow. They tell you these bones are digestible but this is not our first problem with them and there will be no Nylabones in any of our dogs futures. Be warned! Poor Boo Boo!
Monday, February 28, 2011
Tuesday, February 22, 2011
Friday, February 18, 2011
Is it summer where you are???
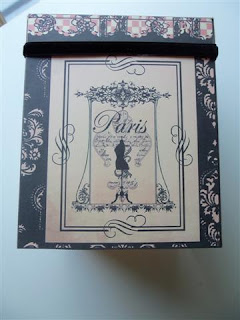
It truly is like summer in February here today! Just beautiful outside, but very muddy from all the melting snow. I must try to get outside a little if only to sit and bask in the sun. It's been a busy week here and I was feeling rather mojo-less so I just did a few little things. One of the projects is this kleenex box cover with a Paris theme. The printout came from Seneca Pond Crafts. Eileeen's products are so reasonably priced and easy to work with I put this together in no time. Just print, cut out and glue together then add a few little decorations. I tried to give you several views.
The other project is an all white five pointed star I made with the Sizzix Five Point Star die. I think this would be great for a shower, wedding, anniversary, graduation or in colors for almost any occasion. The center is a Tim Holtz rosette. I used a CB folder to emboss the individual sections and glued two of the completed stars together then added the rosette and a little bling. Easy peasy! Enjoy
Tuesday, February 15, 2011
New Sizzix Die!!!
OK, Blogger is acting up tonight and this is the second time I posted this!! This is the new SU Sizzix Die called Petal Cone Die. It makes a nifty little cone shaped box and you can make it look so different by just changing how you treat the top part. My pictures are not very good tonight so be sure to click and see them up close. And these little things are rather difficult to photograph. The first one shows the petal top UP and decorated on one side. In the next photo the top is closed and a rose is on the top. In the third photo, the petal sides are folded down and a small half scallop is added underneath. This piece as well as the little banner piece is part of the die. The fourth photo shows the top folded down and the scalloped contrast piece on the top. And finally, just the plain sides folded down with no paper trim. I didn't decorate all the cones, just a few so you could get an idea. These are a fairly good size and would hold candy, nuts, small hobby items, a piece of jewelry and I'm sure you can think of more. And just for fun, Google Petal Cone Die and you will see all the things folks are doing with it. Ice cream cones, carrots for Easter, candy dishes, boxes, flat cones, cards, etc. It's a very versatile die with loads of possibilities. I think you'll like it!
Wednesday, February 9, 2011
The Famous Petal Card Die
For those of you who don't have it or want it, I'm showing you the back of the die. It's like a square with four half circles on each side. It is very hard to find. Having said that, you could probably draft your own template and cut them individually....hint, hint. But here is my third and final project of the day (Good Lord, I have to fix dinner yet and it's 7 p.m.!) This is the heart shaped mini. I used SU paper on this one. I love the combination of teals and browns. There is a box for the mini made from just two die cuts and glued together. Then the mini book itself which has pockets for whatever your heart desires. Some of the little tags I made for the pockets are actually small books.....more opportunities for pictures! The large rose on the front of the box I made from Tim Holtz Tattered Florals die and the center is from the Sizzix 3D flower die (getting to be a favorite). The mini book cover has Recollections and Prima flowers and the leaves are a punch. I added ample bling everywhere. I didn't really make this a themed book so that whoever it goes to could do their own thing. I have decided that all today's projects are for sale. If you are interested, email me for prices. I am addicted to this die! It could be worse, right?
Two Projects in One Day? I'm Cookin'!
Well I got inspired and busy and this is the result. I'm having a good time, can you tell? This box and mini book is made from the Sizzix Petal Card die. I saw this also on You Tube and went on a search for the die since I didn't own it. It is scarcer than hen's teeeth let me tell you. I finally found one, paid more for it than any die I've ever bought but don't regret it one bit since it is such a versatile die. The pictures show you first the little box which is made from two of the petal card die cuts glued together. You can decorate the outside as you wish. Then the little mini book inside the box is made again from the petal card die with the covers made of chipboard and the pages from designer paper. I think you can see on the open pages of the book how the die is folded to create pockets for tags which you can use for stickers, journaling, pictures, etc. Then it is all put together with the Bind It All, my new favorite tool. My daughter is kidding me about this because she bought it for me about 5 years ago and I am just now getting to use it. And it is VERY EASY to use! I again used the Madeline paper from K & Co with various flowers, stickers, brads etc. The little lace medallion on the box cover was one I made on my embroidery machine. Gotta love my Bernina! With this die, you can also made a square box as is shown in my last post and also a heart shaped book or box. I'm working on that next......Valentine's Day remember? Enjoy!
Transformation!!!
This is what happens when you take a $1 chipwood box from Michael's and turn it into a fancy schmancy project! Not only the box but inside is a little book with tags and lots of room for pictures, journaling, and your own mementos. First off, let me say, I found this project on Butterfly Kisses channel on You Tube. I love Arlene's mini books and am a follower of her blog and when I saw this I knew I wanted to try it. The only problem was acquiring a few of the boxes. It seems everyone is "onto" this idea and is raiding the $1 bins at Mike's. I managed to snag 4 or 5 after canvassing 4 different Michael's. The box is about 3.5 x 3 x 2 and comes with the wood button knob and an elastic closure which you remove before decorating. I have one suggestion I learned while doing this. Try and match your paper (which only covers the lid and bottom) to your paint colors for the rest of the box rather closely. It doesn't look as good if there's a large contrast. Once you decorate the box with paint and paper and seal it, you can decorate to your heart's content. The little book is just 2.5" squares of chipboard covered with paper and I made pockets for little tags and pictures then bound it with the Bind It All which was very easy. It just fits inside. In fact I would make the next one slightly smaller as once I get it in, it takes some tugging to remove it! BTW, I used acrylic paints from the craft store and K & Co. Madeline paper and Graphic 45 Staples stickers for the tags inside. The top has a K & Co butterfly, Recollections flower and two mini roses made with the Sizzix 3D die plus a Tim Holtz metal tag. I can't wait to make another one! Enjoy!
Subscribe to:
Posts (Atom)