Friday, November 29, 2013
Black Friday
Don't go out in the crowds and craft shop! There are some wonderful deals on line at your favorite stores.
Flying Unicorn, Ellen Hutson, Classy Cards, JoAnns and others have hefty discounts today and some through the weekend. Take advantage..........just a tip!
Thursday, November 28, 2013
Happy Thanksgiving!!!

Tuesday, November 26, 2013
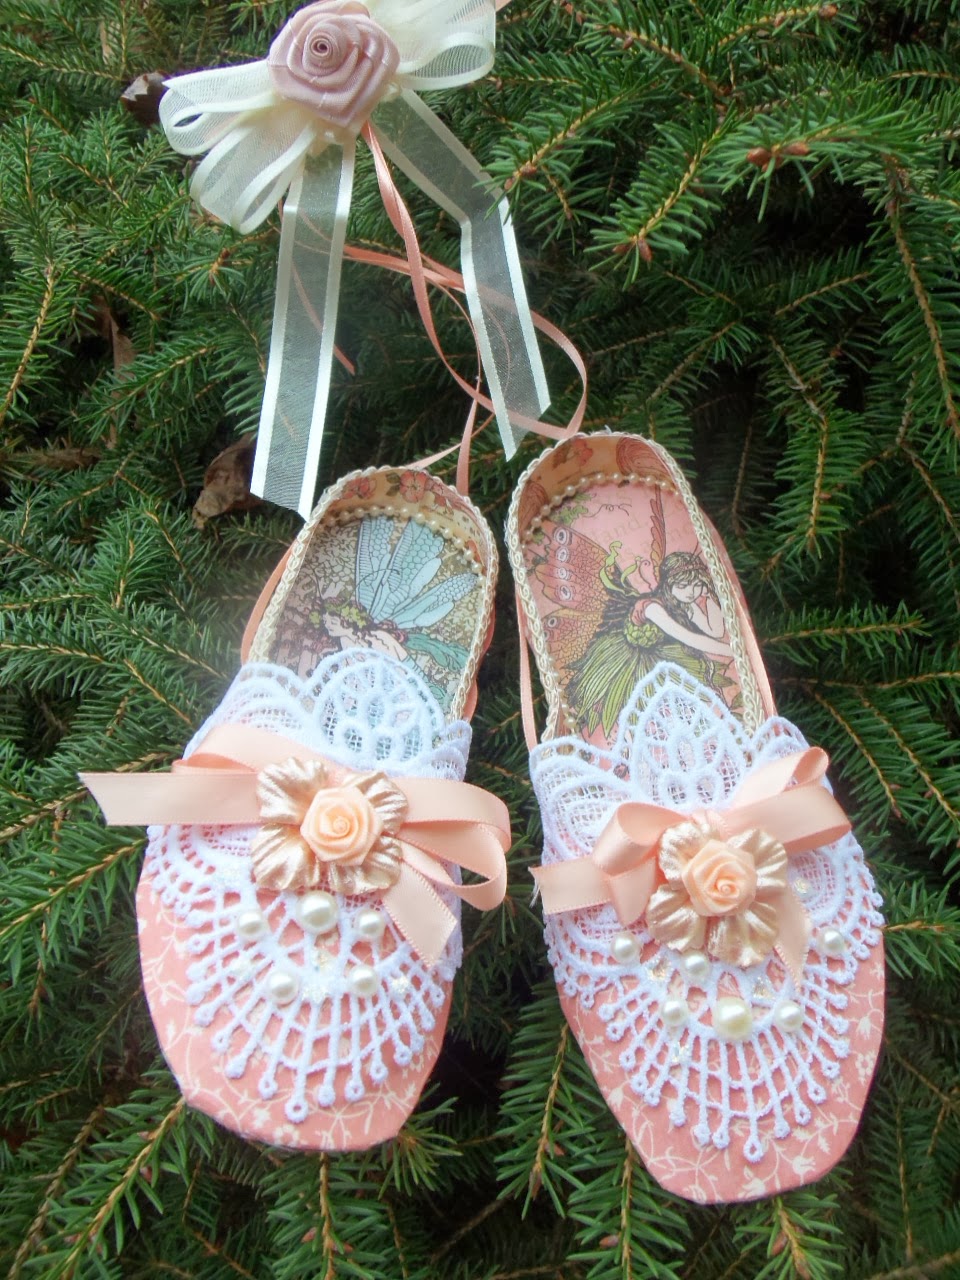
Slippers for Christmas, Right?
I am so taken with these G45 slippers that I made a second pair and, believe it or not, I am starting on a third! The main difference on this pair is that I used a lace motif stitched on my Bernina on the toe of each shoe. I thought it gave a wonderful look. As before, I decorated the toe with ribbon, flowers, pearls and Stickles. The large rose up on the bow-hanger was white and I spritzed it with Glimmer Mist. The paper for the shoes is from Once Upon a Springtime from G45. I have used this paper for so many projects and it's one of my favorites.
Hope there's no snow where you are. Here it is gloomy and dark, the sky is heavy looking and we are waiting for some snow. I hope not much. Enjoy!


Hope there's no snow where you are. Here it is gloomy and dark, the sky is heavy looking and we are waiting for some snow. I hope not much. Enjoy!


Friday, November 22, 2013
Snow......I Wish!
How's the weather where you are today? Dark and gloomy here in Maryland. Looks and feels like snow but there is none in the forecast. This morning I decided to use a couple new dies I purchased in a quick little card. I used Whisper White embossed with a new Darice embossing folder. The greenery and the sled are both Impression Obsession dies and they are really fun. I added Cranberry stickles for berries in the pine branch and had a little fun with the black silhouette of the child in the sleigh by changing out his black hat and scarf for red and green. A bow from my ribbon stash says "baby it's cold outside." Have a good one!


Thursday, November 21, 2013
Frosty Christmas Bouquet
This card uses an image from a stamp set that I think was from Flourishes. I colored it with Copic markers and my goal was to be sure that the greenery was rich with different shades of green, blue green and sage. I used a white pen to highlight the red berries and the juniper berries. There's five layers to this as you can see using Stampin' Up cardstock and Cricut cardstock and I embossed snowflakes onto the white middle layer. Finally, I used a product I really love. The glistening finish is Mr. Huey's color mist in "Shine." It gives a really fine shimmer and always sprays pretty well. I hope you can see it in the pictures. That's it for me today. Be sure to carve out some time for yourself to be creative!


I'm In Love.....
I have a project to show you today that I have just fallen in love with. It's not my original design but that of Denise Hahn for Graphic 45. This was shown on Monday of this week so take a hop over there and see the video Denise did.
What I am speaking of is this Christmas pair of ballet slippers! I have given you several shots of these so you can see them up close and personal. Be sure to double click to enlarge the details. Denise made hers from G45's 12 Days of Christmas paper. My paper is a combination of the lines of several companies. I used an image of the Christ Child in one shoe which was an old card front I saved and the angel image is from Pion Design which is a company from Sweden. Their papers are totally gorgeous and more and more available in the US now than they used to be. If you can find yourself some, you won't be disappointed. The slipper paper has large snowflakes which are glittery on a pale blue/green background. I used some braided and pearl trim as well as cream ribbon with Recollection roses and little snowflakes of various sizes on the toes. Lastly, I added pearls and Stickles for some bling.
I won't say these were a snap to make but they were not impossible. You just have to take your time and go slow. Denise's video is excellent and just goes through the construction of the slipper itself. She leaves the fun part of decorating to you. They would make a wonderful addition to a tree, hung on a doorknob, or as a gift for a dear friend. Enjoy!


Monday, November 18, 2013
Sunday, November 17, 2013
Hooo's Ready For Christmas?
Having so much fun with Mr. Owl! Today he is a snow owl, all wintery and white. Added some cream and very faint distressing with Vintage Photo. The embossed background is a Darice embossing folder from JoAnn's. They are carrying the whole line and they are really nice. The owl's body was from a scrap of handmade paper I had and to distinguish between the head and the bottom I used a very light grey Copic marker along that line. Romantic Rectangles by Spellbinders was used to cut the small rectangle behind the owl. The sentiment is from Winter Bouquet which I think is a Flourishes stamp set. A little glitz and a little shabby! I like it!


Wednesday, November 13, 2013
Hooo Wishes You A Merry CHRISTmas?
I have never owned a Cottage Cutz die but fell hard for this little owl, not my usual thing. He is called The Acorn Owl. But I just love him and I see all kinds of projects to use him on. Except for the Kraft base card, everything came from my scraps. I very lightly highlighted him with Tim Holtz Distress Markers. His eyes are black enamel. and the ribbon is from a whole spool I bought years ago at an after Christmas sale. The glittered snowflake is Michaels, again an after the holiday sale. Have a great day!


Tuesday, November 12, 2013
This is my first CHRISTmas card of the year! I don't send a lot of cards but I enjoy making them and putting myself in the holiday mood. I was very anxious to make this card. Why? I've had the Tim Holtz poinsettia die for about a year and I just felt so-so about it. Then I was tipped off to the fact that there was a matching embossing folder and I think you can easily see the difference it makes. The texture is superb! I used the same die for the leaves. If you look at a poinsettia, the leaves and flower petals are the same. I added just a tiny amount of Distress Ink in Bundled Sage to the leaves with markers. The cardstock is Whisper White (SU), the pink is K&Co and is very shiny but I don't think you can see that. The background square doily is Spellbinders Lace Doily. This die always gives me trouble getting the right "sandwich". I think the secret is to use a little thinner paper . I then sprayed this with Mister Huey Color Mist called Shine and it really does! A little silver ribbon (looks like a package don't you think?) and some silver Stickles finishes it off. Back soon with more CHRISTtmas projects! Be sure to double click on the image for a close up.


Wednesday, November 6, 2013
A Storage Solution.....At Last!
I don't know if you are like me but I'm always searching for better storage for all the "stuff" we papercrafters have. In particular my Copic marker collection had long since outgrown its previous home and I had been searching for a solution everywhere. There are racks, cubbies, pails, tins, bags, etc to house these wonderful markers but none that I liked or were affordable for me or held the markers in order the way I wanted. This past weekend while I was surfing the net, I found a post from 2011 where a lady had devised a system which looked very interesting. Then her blog sent me on to others who had upgraded and modified her system until I finally came to this blog: http://janesboxofcolours.blogspot.com/2011/11/copic-storage.html. The more I studied it the better I liked it and when I headed off to Office Depot and Home Depot to pick up the components it was VERY reasonable.
Here are some specifics: The box I used came from Office Depot but Staples also sells them. It is from a company called Really Useful Boxes. I'll never buy another Sterlite, Art Bin or Rubbermaid box! These are that good and come in a gazzilion different sizes and configurations. If you use this box, you need the 11 litre size. You can probably use other brands of boxes, just check your sizes. If you only have a few markers and don't plan on getting more, you can just get a smaller box. But the Really Useful 11 litre will hold ALL 358 markers with room for expansion when Copic comes out with more shades. The one blog recommended the Art Bin Double Deep Satchel which JoAnns has. It was $40 and you could use a half price coupon. If using this box, you can get the lid on it and the pens sit further down in the box. If you travel or go to crops or whatever, this might be the box for you. Then the dividers are egg crate style ceiling tiles from Home Depot. If you go on their web site, they only sell them in fives but in the store you can buy a single one. You can cut them with a saw, a Dremel or heavy duty tin snips There are two layers, a top and bottom. You hold them in place in your box with long screws in each corner. This method does take up about 8 marker spaces. The other way is to get transparent caulk and caulk the crates in. Sounded messy to me so I went with the screws.
You can leave the box flat if you have that much empty real estate on your desk or table. It is advised that you store these markers on their side, but I know plenty of people who have stood theirs up on end for years and never had a problem. I am standing my box upright on one long side. It is VERY sturdy but if you feel you need it, you can add a long strip of wood, heavy duty plastic or whatever under the front edge. I'm going to use a strip cut from an old Sizzix Extended Platform because it more or less matches the box. I just love the new system and my wonderful husband did all the work! I have posted lots of pictures so you can see what I'm talking about. If you have any questions, feel free to email me. And of course, you could use this for any other markers, pens, pencils etc THAT WILL FIT IN THE SPACES IF THIS GRID. Be sure to check this first. My markers are the Copic Sketch. I can't guarantee you all markers will fit. You must test that for yourself. But for about $30 I am very happy with this.


 PS: I forgot to mention that there is a girl on Etsy who is selling these already to go for $65 I think it was. Just another option.
Here are some specifics: The box I used came from Office Depot but Staples also sells them. It is from a company called Really Useful Boxes. I'll never buy another Sterlite, Art Bin or Rubbermaid box! These are that good and come in a gazzilion different sizes and configurations. If you use this box, you need the 11 litre size. You can probably use other brands of boxes, just check your sizes. If you only have a few markers and don't plan on getting more, you can just get a smaller box. But the Really Useful 11 litre will hold ALL 358 markers with room for expansion when Copic comes out with more shades. The one blog recommended the Art Bin Double Deep Satchel which JoAnns has. It was $40 and you could use a half price coupon. If using this box, you can get the lid on it and the pens sit further down in the box. If you travel or go to crops or whatever, this might be the box for you. Then the dividers are egg crate style ceiling tiles from Home Depot. If you go on their web site, they only sell them in fives but in the store you can buy a single one. You can cut them with a saw, a Dremel or heavy duty tin snips There are two layers, a top and bottom. You hold them in place in your box with long screws in each corner. This method does take up about 8 marker spaces. The other way is to get transparent caulk and caulk the crates in. Sounded messy to me so I went with the screws.
You can leave the box flat if you have that much empty real estate on your desk or table. It is advised that you store these markers on their side, but I know plenty of people who have stood theirs up on end for years and never had a problem. I am standing my box upright on one long side. It is VERY sturdy but if you feel you need it, you can add a long strip of wood, heavy duty plastic or whatever under the front edge. I'm going to use a strip cut from an old Sizzix Extended Platform because it more or less matches the box. I just love the new system and my wonderful husband did all the work! I have posted lots of pictures so you can see what I'm talking about. If you have any questions, feel free to email me. And of course, you could use this for any other markers, pens, pencils etc THAT WILL FIT IN THE SPACES IF THIS GRID. Be sure to check this first. My markers are the Copic Sketch. I can't guarantee you all markers will fit. You must test that for yourself. But for about $30 I am very happy with this.


Friday, November 1, 2013
The Raven's New Cheerleader
.JPG)
Subscribe to:
Posts (Atom)