Tuesday, April 27, 2010

A Productive Day! Dress Forms Are Finished!!!


I never thought I'd finish but here they are. I'm not going to photograph the ones I already showed you. Go back a few posts if you wish to see those. These are the latest and the last ones. The one with the heat embossed heart that says Life's A Stitch is the front page. I showed you the back page last night. You can click on each picture to see the details up close and personal. If you have any questions about techniques or what I used, just email me. Enjoy! I sure did!


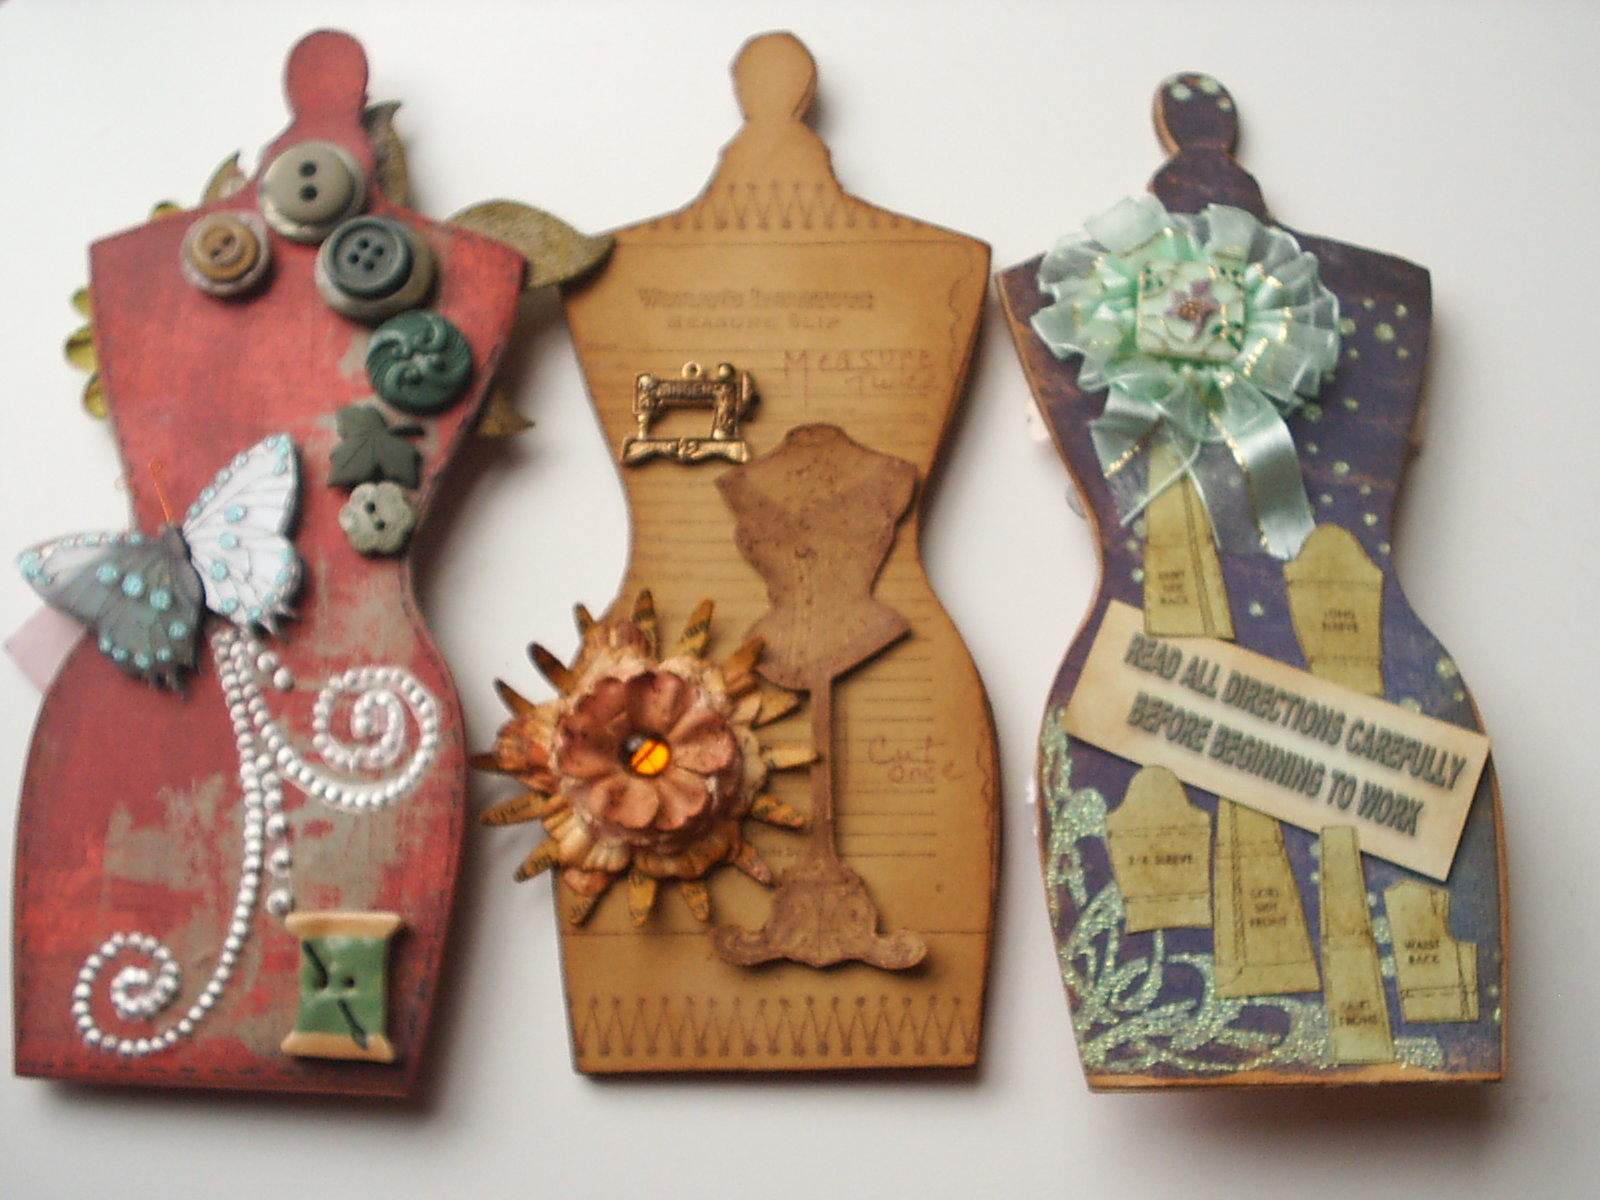


Vintage-y Dress Forms


This is the back "page" of the Maya Road dress form chipboard book. It's different because it has the bottom part of the stand on it. I decided to do a black and white scheme on this one. The one on the bottom has an actual vintage measuring tape. My neighbor's sweet mother passed away last summer. Just this last week she gifted me with her Singer featherweight and a huge box of old sewing items AND the nightgown of a woman in the family who was a nun. When I get it washed and starched I'll show it to you. So many goodies in the box too. Miss Vicki was one of the sweetest women I've ever had the good fortune to meet, funny and sharp even at 96, and a great loss to us all. Well, I'm off to do a bunch of errands and then back to more dress forms. There are still 3 more pages to do!!!!

Sunday, April 25, 2010

A dreary Sunday....


It's a rainy, overcast dreary Sunday here. Hope it's nicer where you all are. I have one little project to show before you all think I have fallen off the face of the earth. It's just another page in my chipboard dress form book. I made the pearly swirl myself. This technique is covered in several posts back. Used some adhesive gems and primas with a little Vintage Photo distressing on the edges. I'm really trying hard to get back in the groove but gardening chores and spring cleaning as well as my general mood are holding me back. I'm hoping this week I'll be able to spend some more time in my studio! Thanks for your patience!

Tuesday, April 20, 2010

Well it's with a heavy heart indeed that I am here today to tell you that the hearing did not go well yesterday. I was granted a peace order against my neighbor but he was also granted one against me. The judge let him stand up there and tell a pack of lies and his wife testified to what she saw and heard which were also lies. When it was my turn he wouldn't accept a notarized letter from neighbor. He said I had to have witnesses. None of my neighbors would come because they are afraid of him. I also had proof that he lied on his peace order application and was not allowed to present that because it had to concern an action in the last 30 days and yet he was allowed to go back months while spitting out his lies. I got what I wanted in the end but I was also subjected to a humiliating experience at the hands of this man and the judge who was obviously prejudiced toward women. I always thought if you told the truth everything would come out right. I'm here to tell you faithful readers that it doesn't work that way. And I've also learned to take it with a grain of salt when people say they are your friends. Thanks to all of you who have prayed for us. I'm still in need of that. My faith in humanity is really shaken.

Thursday, April 15, 2010

Absence Makes the Heart Grow Fonder.......

........I hope! Sorry I've not been around the last weekor so. We have been entangled in a rather nasty legal matter regarding our neighbor and have been to court once and must go again this Monday the 19th. I hope all of you will say a prayer things go well. Then hopefully I'll be back with something special.

Sunday, April 4, 2010

A Happy and Blessed Easter


No perennials yet and we've moved some plants but my purple plum seems to be announcing Easter in a grand way. Just wanted to wish all of you a wonderful and blessed day with your friends and family!

Tuesday, March 30, 2010

A Fun Project!!!


As soon as I saw the Maya Road dressform chipboard book, I knew I had to make something fun with it. I've finished three pages, both sides, and I thought I'd show you how it's coming along. I covered each with paper, mostly scraps, sanded the edges and inked with Vintage Photo Distress Inks. I used lots of Tim Holtz products, various sewing related stamps, old buttons, mini chipboard pieces, K&CO butterfly, my own pearl swirls (see former post), and an old watch face we found among my MIL's things. I'm very happy so far with how they are coming out. There are 3 more inside pages and the front and back cover (that's 10 more sides to do!!Yikes!) but I am taking my time and trying to make them really special. I have loved sewing all my life and have made clothing, quilts, dolls, curtains etc over the years. It's still my first love. Enjoy!

Thursday, March 25, 2010

Classic Blue and White


Blue and white is so crisp and classic, don't you think? This is a new Lockhart stamps image and they are the most fun stamps to color. I used Copic markers and some stickles on the flowers. Then Labels Eight and the Fleur De Lis cut from Nestabilites finished it off. A few pearls.....done!
I had a couple folks ask about where I got the cuts for my last two cards. They came from a site called Scale Files. Here's the link: http://scale-files.blogspot.com/search?updated-min=2010-01-01T00%3A00%3A00-08%3A00&updated-max=2011-01-01T00%3A00%3A00-08%3A00&max-results=14 The gentleman who does these is a doctor and he generously gives them to the general populace for free. His work is exquisite. You do have to have software, either Sure Cuts a Lot or Make The Cut to use these types of files. Check it out!

Wednesday, March 24, 2010

Sweet Butterfly Easter Basket


Made this little basket today using my Cricut and some SU paper. Finished off with a simple layered handle and some pearls for the butterfly head and some shred inside. I used red sticky tape on this one because chocolate bunnies and jelly eggs are heavy, don't you know! Enjoy

Tuesday, March 23, 2010

Love The Little Lambs


I have a thing for sheep. There.....I said it. It's out! Ask anyone who knows me. I have sheep figurines, sheep pictures line my upstairs hall, I have a sheep cookie mold. That said, I was ecstatic to find this cricut cut. When I saw the sheep, I was a goner. Just used a simple layout and colored the cut out with copics and Distress Inks. Hope you enjoy it!

Monday, March 22, 2010


It's a drearly rainy day here friends. And I am sore in places I didn't know I had from working outside for hours yesterday. Spring garden chores are never ending!
So today I have this little chipboard tag to show you with a grungepaper flower, chipboard sentiment tag and the background is a tag shape overstamped with Distress Inks and Wendy Vecchi stamps in the new Distress colors which are fabulous. I added a little dragonfly on the flower. In cleaning the other day I unearthed this whole bag of charms I had bought for some quilting project eons ago.
Well, that's it for today. Most of the week is supposed to be like this. I just want a nap when we have weather like this!

Friday, March 19, 2010

Easter Basket Fun!


The weather is beautiful here, although not for long, and I am in an Easter/Spring mood! I used the new Flourishes Easter Basket stamp set to make this card. I actually cased it from Danielle Kennedy who designs for Flourishes. After photographing the card I decided to add some Stickles to the eggs and chick. The paper is Urban Prairie by Basic Grey and the flower is a Prima. First day of Spring tomorrow!!!

Cricut Egg Card


This little card was cut on the Cricut. The base I found on a website called Monica's Creative room. She has wonderful cut files. The inside little egg is from the Cricut Easter cartridge. I gussied it up a little with Stickles and stamped a Flourishes sentiment on one side, leaving the other free for a personal note.

Thursday, March 18, 2010

A Lovely Blog Give Away!!

Always wanting to share the goodness and new in blog land with you, I would encourage you to visit http://michellepalmerart.blogspot.com/ and see Michelle's lovely art work and her latest giveaway. Sweet!

Wednesday, March 17, 2010

Tuesday, March 16, 2010

Blog giveaway!!!

http://whitelinenlavenderfield.blogspot.com/2010/03/celebrate.html#comment-form Visit this blog to see a beautiful giveaway. If you are in to shabby chic or vintage, this is for you.

Monday, March 15, 2010

SCRAPS!!!


What you see here is a huge pile of both card stock and designer paper scraps. There are SU, K&Co, Basic Grey and more DP and the cardstock is mostly SU with some renegades thrown in! There are some metallics as well. If anyone is interested and willing to pay the shipping, give me a holler and I'll get them right out to you. I imagine they would fit in a Priority Mail flat rate box. Do I have any takers???

Friday, March 12, 2010

I love Wendy Vecchi!


Today I got my first Wendy Vecchi stamps in the mail. Could wait to get my fingers inky and "make art" as Wendy says. This was just a chipboard tag from a mini album in the dollar aisle at Mike's. I used Wendy's stamps, colored with distress inks and the flower is of my own making using a prima base and a sizzix die for the top layer. Then I used a bronze giant brad. Love these little quickie art pieces! If you want to look at her art, here is Wendy's blog:

Tuesday, March 9, 2010

Amazing Technique


I found this amazing technique and I just had to share with you. My daughter recently directed me to the following blog:
http://angelicascrappenings.blogspot.com/. The girl whose blog it is does some absolutely gorgeous work. You've all seen the packages of pearl and gem "bling" as seen in the above picture on the left. Mostly they run $2.99 and up. They are very pricey and if you like to use them a lot could get prohibitively expensive. The pearl swirls below on the pink cardstock I made myself!!!! Yes, I know, amazing! If you go to Angelica Scrappenings blog and scroll all the way to the end, she will show you how it's done. Basically, you take the manufactured bling, lay a transparency over it and apply your dots of Liquid Pearls or Stickles, gems or whatever. Liquid Pearls works great and is what I used in my samples above. Then you trim the transparency as close as you can and apply with glue dots. It's amazing! In my sample, what I did was lay the purchased swirls on the copier and make copies, then I laid that under the transparancy, taped it for stability and used my Liquid Pearls. Try this and be sure to check out Angelica Scrappenings.