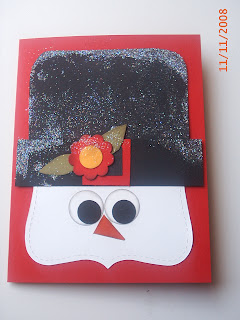
OK, first off I can't take credit for this idea. I first saw it on Stampin by the Sea's blog but she gave no directions. So I did my own thing and I'll be glad to tell you how I did it.
Supplies: SU cardstock Basic Black, Whisper White, Real Red, Really Rust and Summer Sun. SU Top Note Die, one inch square punch, 1/2 and 3/4 circle punches, star punch. Versamark, Heat and Stick powder, SU Dazzling Diamonds glitter, adhesive, Basic Grey ink.
1. Cut one Top Note die from Whisper White and another from Basic Black. Trim the top of the Basic Black straight across but follow the curve of the corners and trim straight down the sides. The top of the hat should be approx. 3" top to bottom, so you are trimming off the bottom of the black top note die.
2. Glue the black top and the white bottom together then cut a 1" by 4" black strip for the brim and adhere to the top and bottom.
3. Eyes are done with the 3/4" and 1/2" circle punches. The whites are sponged on the edges with Basic Grey ink. Glue down the eyes approx. 1 1/2" from the bottom point of the white Top Note.
4. Punch a star from Really Rust and trim off one point, straight off. Sponge edge with Basic Grey and adhere to face.
5. Cut a 1" square from Real Red for the hat buckle. Then you can do one of two things. Cut a smaller square from the center or use a small black square to make it appear the center is cut out. Glue this down on the hat brim.
6. For embellishment you can use any flower die or a snowflake die. I used a Cuttlebug flower, a 1/2" punched center from Summer Sun and freehanded two leaves. All these were sponged on the edge with Basic Grey. It just gives them definition.
7. Finale! Sponge Versamark, then Heat and Stick powder wherever you want the glitter to be. Heat, then apply glitter. It's kind of a hit and miss thing but I think you could control it better if you sponged on the versamark. I just used the pad.
You can then use your snowman on a cardfront as I have or on the top of a tin or box, as a tree ornament, etc. So many ways to use this. I thought after I took the picture that I should rosy his cheeks with some Real Red, very lightly.
Enjoy! If you have any questions, just let me know. WOW! I guess I just did my first tutorial!!!
2 comments:
How very very adorable! I love his eyes! He reminds me of how a Russian might look in the coldest parts of Russia. A really great card!
Of course I do know it a she! I always do things in the masculine whatever!!! It's also late. LOL
Post a Comment